Usually, my posts here on TGC consist of ways to repurpose my thrifted finds.
But every now and then, I run across something that—even though it really can’t serve another purpose—would sure look a heckuva lot better with a little “sprucing.”
So, today’s post is all about revitalizing a thrifted find—specifically a funky $4 pillow I found at Goodwill that possessed at least a hint or two of Anthropologie-ish appeal.
We’ll start with the before, just so your expectations can be at rock bottom.

I know. Pretty unfortunate, right?
I just had to rescue her!
And since I tend to associate Anthro pillows with unexpected color schemes and florals + animal references, I decided to run with the vision in my head and see what I could come up with.
Here’s what I started out with:

::turquoise lace + ribbon (because turquoise anything immediately makes things feel fresher and more fun!)::
::contrasting thread::
::graphic fabric::
::hot glue gun (her name is Glenda)::
You might also need:
::a sewing machine, if you plan to stitch as well as hot glue::
::animal silhouette (you’ll see what I chose in a second):;
1. First, I took out the pillow insert so that I could navigate my sewing machine without accidentally stitching the pillow cover to the insert.

2. Then I positioned my lace and my ribbon and secured both with a thin bead of hot blue down the center of each strip.

Aaaaah…already so much better, no?

3. I stitched around the edges of both my lace and my ribbon—to make sure they didn’t come loose and also because I liked the look of the contrasting orange thread against the turquoise. It gave the trim a nice, finished feel.
4. I’m usually terrible about seasonal décor (although, every now and then, I get inspired like I did here and here), but I decided that, since I wanted to try to add a fun animal theme to this pillow, I would go with something appropriate for Spring.
So, I chose the most generic, non-copyrighted bunny silhouette I could find on the internet and then put him in Microsoft Word, stretched him to the scale I wanted (no need to worry about pixels since all I wanted was the outline), and printed him out.
5. Then I positioned him on my chevron fabric, and cut around the outline of the bunny.

6. I eyeballed placing him in the middle of the pillow cover, secured him with a dab or two of hot glue, then stitched around his outside edges just like I did the ribbon/lace trims.
7. Last, I pulled out my stash of vintage buttons that my husband’s grandmother gave me (thanks, Grandma!), and chose a button for Gerald’s (that’s the bunny) eye and four more to hand-sew to the four corners of the pillow for an extra touch of whimsy (oh, and to cover up some wonky stitching!).

8. Finally I was able to take Gerald outside perched on his new background and let him enjoy the lovely Spring air.


Let’s take one more gander at that “before,” shall we?:

And now the after:

Pardon me, I hear the phone ringing, and I think it might be Anthro wanting to patent my design. : )
Okay, so maybe not exactly, but I do think my Gerald the Bunny pillow at least rivals this particular specimen:
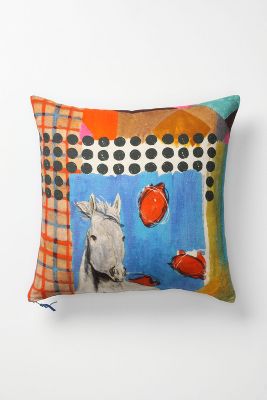
This one too:
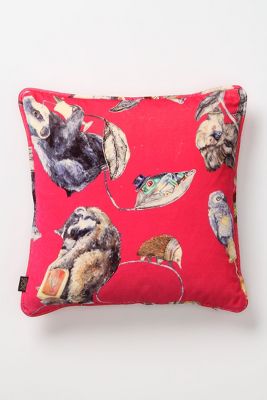
Not to mention that these…ahem…lovely examples cost $128 and $168 respectively.
And considering that everything I used to embellish my pillow came from my stash at home, my total out of pocket cost was: $4.32.
Beat that, Anthro!
If you like what you see here, I would love for you to swing by for a visit at my primary blog:

or at my 100% thrifted style blog: Secondhand or Bare Bottom.
Hope to see you soon!
Gerald and I will be enjoying the sunshine.
Abbie